


First off, today (Friday) is the last day to enter the GIVEAWAY, so make sure you're entered.
I have seen so many great child silhouette projects lately and decided to try my hand at one.
The silhouettes themselves were super simple. I just took a profile photo of each kid, enlarged it on the computer, printed it out, traced it onto black scrapbook paper and cut it out. So easy.
But I felt like it was still missing something, so I did a little word art...the cheater's way.
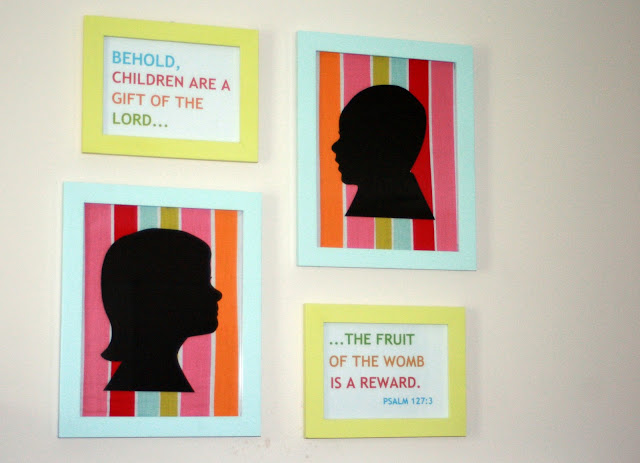
(Unfortunately the reflection of a window makes it hard to get a good picture...but you get the idea. Also, don't blow your candles out too hard...does anyone have a tip for getting a wax stain off a wall?)
We have Photoshop Elements, but it isn't currently working. So I learned how to cheat your way to some cute word art on Picnik.com (a free site with lots of fun photo-editing features, although you can upgrade and pay for more options).
Picnik Word Art Tutorial:
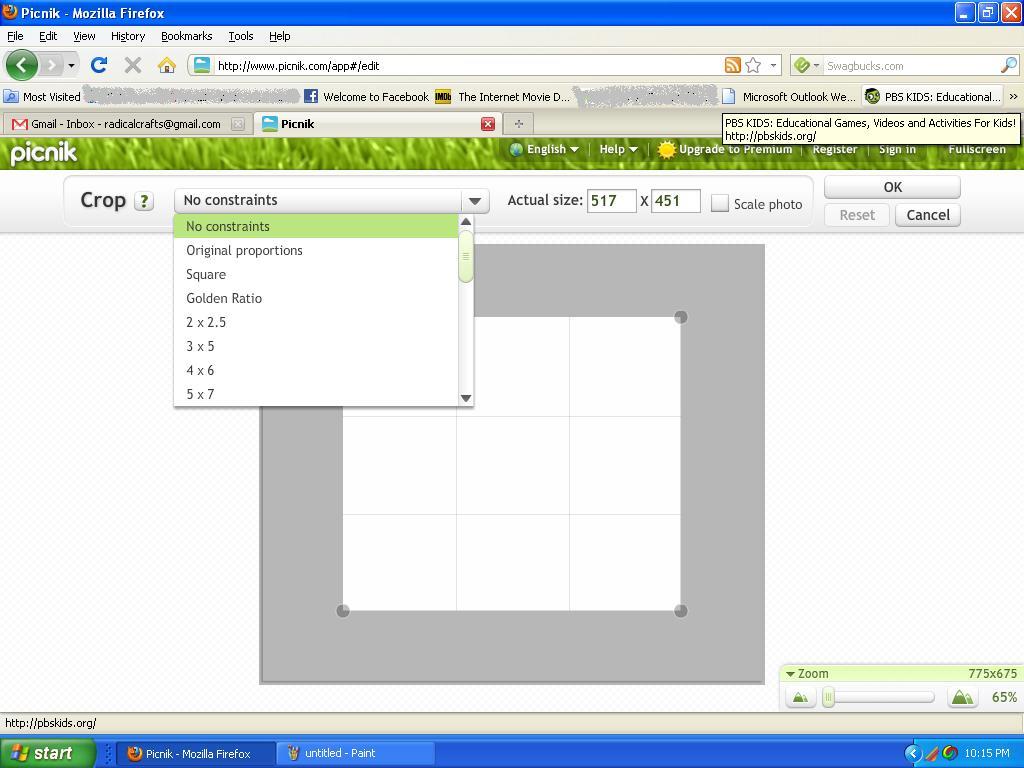
First, you need to have a picture for your background. I just found a white background via Google, but you could use fabric, scrapbook paper, etc.
Upload the background to Picnik.

Click on "Edit" and then "Crop"
Choose your photo size from the drop down options. I used 5x7.
Then click on "Create" and choose the "Text" option.

This is where it gets fun. Picnik actually has a great selection of free fonts to use. Choose a font, then enter your text into the box at the top left.

Since I was using several colors, I actually went through the text process 4 times. Each time you type your text, then choose a color from the text toolbox that appears. You can then change the size and several other features.
My art is very simple, but there are practically limitless options for creativity. You don't have to be a Photoshop pro - you just need a little imagination and some time to play around. It's incredible user-friendly and super fun to play with!
Have a great weekend!
Linking up at:
Linking up at:


I just found your blog and am your newest follower! You are one talented woman who has left me completely inspired. Thanks for the great blog and I love your wall display!!
ReplyDeleteSo impressive and I think I am going to put space in my calendar this next week to make this!! Thanks for the great idea!!
ReplyDeletestopping by via Serenity Now!
~meri
I love Picnik! It is so user friendly. Thanks for sharing this tip. I wondered how to create wall art with it. White background photo? Now I know. I also love your idea of taking photos of fabric. I have a big stash of that. So happy to have found you in blog land!
ReplyDeleteSaw you featured at Serenity Now. I have never thought to use Picnik like this. Your display looks wonderful. :)
ReplyDelete